Jury-Rigged or Jerry-Rigged Broken Broom Handle Repair?

I was out using the manual edger around our lawn today. When I finished that and started sweeping up the grass cuttings, my broom snapped off at the brush cap. The pole is a thin steel shaft and the end that fit into the cap of the brush was rusted through.

After I finished sweeping using a push broom, I figured I’d have to buy another broom. Then I got curious about whether I could fix it. There are a couple of terms for repairs that might fit here.

Jury-rigging means a make-shift repair that works. Jerry-rigging is slightly different and refers to a repair that is not just home-made but carelessly done.

I checked the internet and found a YouTube which described a fix for my broken broom. It looked very similar. But I would have needed to go out to the hardware store and buy either a pipe-fitter or a hacksaw. The instructions also called for using a drill to make a pilot hole for a small screw.

I thought it would be cheaper and faster just to buy a new broom. But the more I thought about it, I got an idea for a temporary fix. One element of it is how you would fix a loose shaft in a push broom. You just turn it around and bang it into the floor and it jams the pole into the brush handle hole.

What I did first was to think of what tool I had which might help. Because the end of the handle that fits into the brush cap was rusted out, I used a pair of tin snips to trim off the loose rusty fragments. That took off about an inch of the shaft.

I pushed the shaft into the brush cap, turned the broom upside down and jammed the shaft back into the cap. The broom was a little shorter but it was usable. And I didn’t have to run to the hardware store.

Now is that jury-rigging or jerry-rigging? Just like the two words probably derive from each other, the job was a little of both.

I’m still going to need a new broom because I’m not sure how long the fix is going to last.

GFCI Outlet Torture

There’s this exercise machine commercial which has actors ask “Do you want some more?” This is the usual exhortation letting you know more pain and torture is needed if you really want to get in shape.

Well, replacing Ground Fault Circuit Interrupter (GFCI) outlets is one way you can get more torture—but only if you really want it.

I’ve replaced GFCI outlets before in our house, but yesterday I had to replace a few more. I got charley horses in places I didn’t know I had. It also took a lot more time. It took me several hours to replace just 3 of them.

You have to know something—I’m not a natural handyman. I’m also not really a trainable handyman. I’m terminally resistant to handyman stuff of any kind.

I didn’t find out the next fact I’m going to mention until after I installed the GFCIs, but since 2015, so-called Self-Test GFCIs are available—which is what Sena bought but didn’t know it. They automatically monitor the GFCI periodically. Ours self-test every 3 seconds, which sounds impressive, until you hear the rest of the story.

I found the International Association of Electrical Inspectors (IAEI) blog post which has an interesting post about Self-Test GFCIs. First, they describe why the Self-Test GFCI was made, which is that consumers rarely, if ever, tested them once a month as recommended to ensure they work.

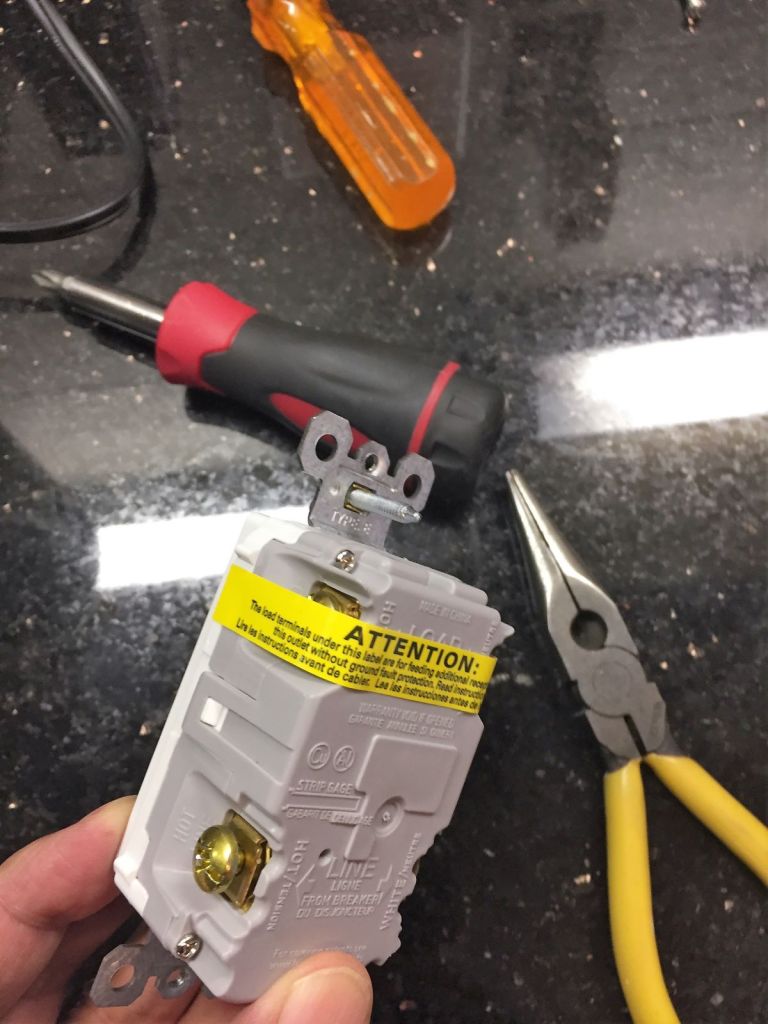
New requirements now ensure that power denial to the GFCI and any downstream connected devices (which is what the term LOAD refers to on the GFCI outlet) when the GFCI wears out. But there’s a special exception for the self-test:

The general requirement in the event of a test failure during the auto monitoring also requires “power denial”. However, there is a special exception for two specific failure modes that allows an audible or visual indication as an alternative. These failure modes open the trip solenoid and open the solenoid driver component and make it impossible for the device to trip with these components open. The improved functionality of the GFCI resulting from the auto monitoring will provide enhanced protection for the consumer against electrical shock hazards.

The auto monitoring or self-test feature periodically tests the electronics from the sensing toroid to the trip solenoid driver and will pick up a failure of the majority of components in the GFCI.  It cannot, however, test the trip solenoid driver, the trip solenoid itself or the contacts to see if they are welded. Testing those components can only be done by actually making the GFCI trip. It is not practical to have GFCIs randomly tripping off during self-test cycles. So, the manual test button is still provided and it should still be used periodically as recommended. The presence of the self-test function is not allowed to affect the tripping of the device within the specified trip time requirements if an actual ground fault occurs.

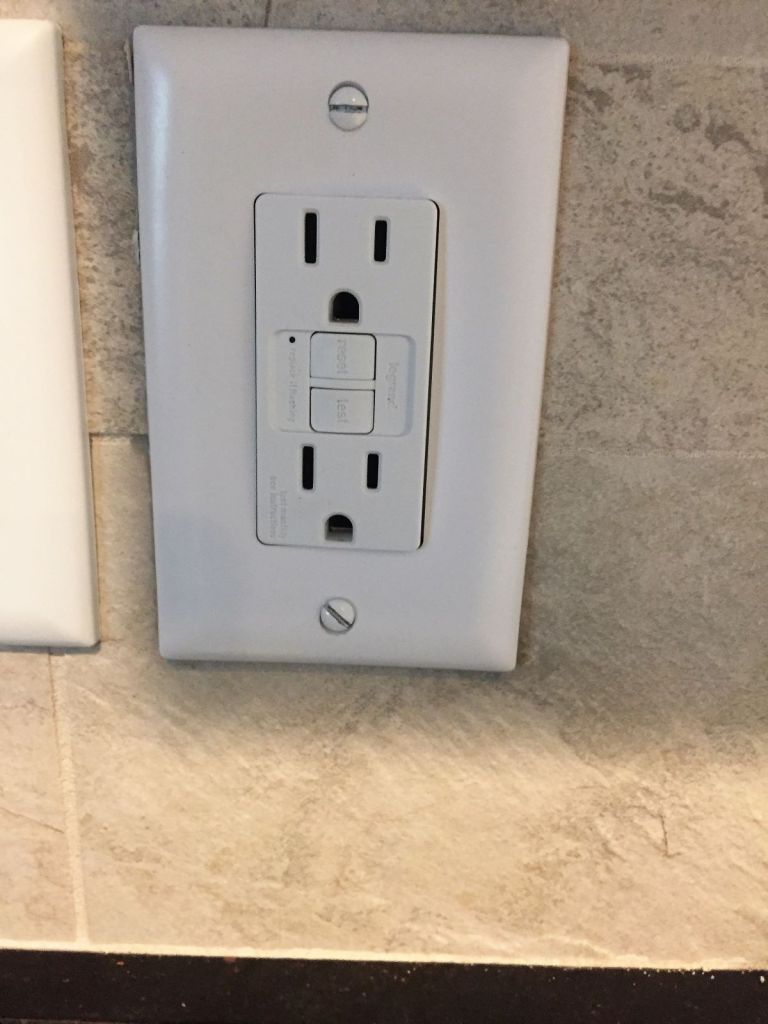
OK, two things to notice here. One is that if you have the self-test model which has a visual indicator (the red test light). Our GFCI indicator light would flash for this. That means you can’t plug a big night light in it, which would block your view of the test light.

The other thing to note is that you still have to periodically manually check it—even if it automatically self-tests every 3 seconds. That’s because if the GFCI actually did self-test the real-life relevant components, your hair dryer, radio, lava light or whatever would stop working at awkward moments.

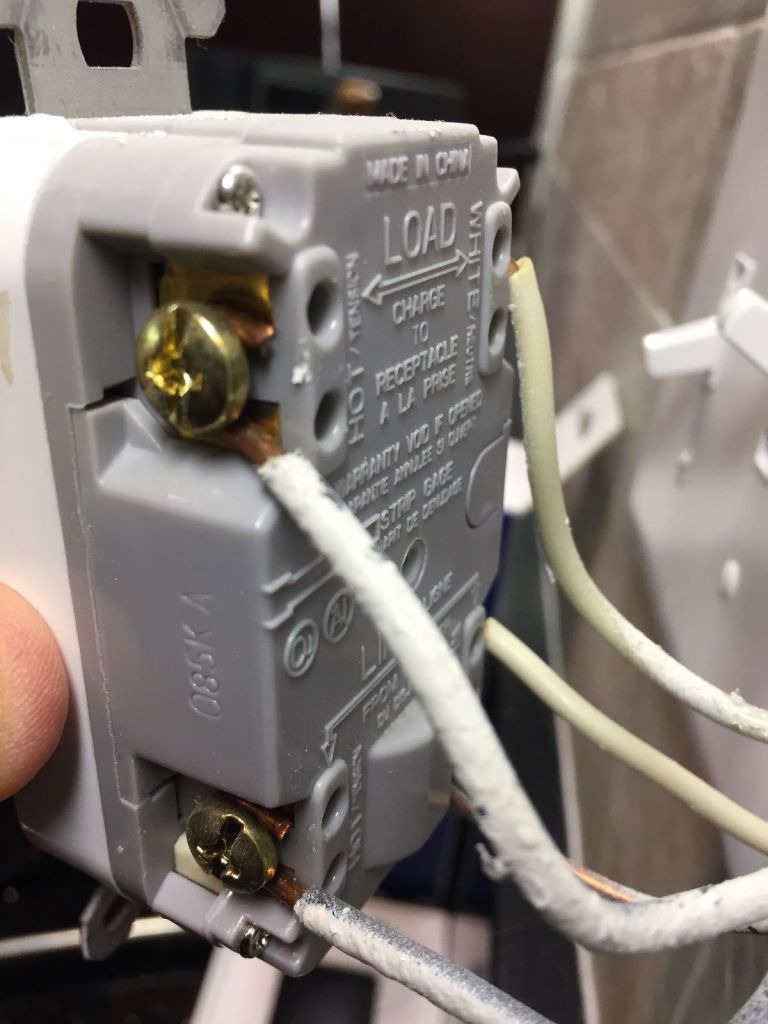
Anyway, I had a heck of a time getting the GFCI wires out from under the terminals. The procedure is not markedly different from changing an ordinary electrical outlet. You just have to make sure you get the right wires to the right terminals for LINE (in from the circuit breaker) and LOAD (out to the lava light). Changes in the design and explicit instructions are included with the product.

The hot wires are usually black (which go to the brass terminals), the white wires are usually white (which go to the silver terminals), and the ground wire is usually an orange unjacketed cooper wire. There can be as many as 4-6 wires.

Should an ordinary homeowner or an electrician replace a GFCI outlet? In fact, the included instruction sheet starts off with just this question, “Should you install it?” And yes, the word “you” is underlined. You only see it after you bought the product in the hardware store and open the package.

This does not bolster my confidence, which is already low to nonexistent.

The instructions say that you should make sure that you:

  • Understand basic wiring principles and techniques.
  • Can interpret wiring diagrams.
  • Have circuit wiring experience.
  • Are prepared to take a few minutes to test your work, making sure that you have wired the GFCI receptacle correctly.
  • Have updated your life insurance policy and your last will and testament (just kidding).

I’m not going to mention that the first 4 bullet points don’t count for ordinary consumers who are trying to save the cost of hiring an electrician to do the job for you. According to the Costimates website, this can range from $140-$310. The cost of an intensive care unit admission, funeral, etc., don’t appear anywhere on this site.

But the cost of a GFCI unit is about $20. Any questions?

I kept the instructions on the counter. I made sure I had enough lighting. We have under cabinet lighting on a separate circuit from the outlets. I shut off the relevant circuit breakers.

THESE ARE NOT INSTRUCTIONS. THIS ENTIRE POST IS AN ANECDOTE. YOU SHOULD FOLLOW THE INSTRUCTIONS INCLUDED IN THE PACKAGE OR HAVE A CUP OF COFFEE WHILE WATCHING THE ELECTRICIAN DO THE WORK (HAVE YOUR CHECKBOOK OR CREDIT CARD HANDY).

When I took the face plate off and pulled out the receptacle, I notice that most of the wires had a white coating, which a lot of wires seem to have. It’s uneven and it might be drywall spray? I can always tell which wires are white, black and ground. The ground wire is on the bottom of the receptacle, secured with a green terminal.

The hardest part was freeing the old copper posts from under the terminals and getting the news ones on. I twisted myself into a pretzel as I wrestled with the job. I was right next to the toggle switch for the overhead light and jumped every time I accidentally switched it off—which was several times.  I could have done without intermittent sudden flashes.

I followed the instructions closely, especially for testing my work. They worked. I started the job of replacing just 3 receptables about mid-morning. I finished at 2:00 PM. The average estimated time for this chore is about 15 minutes per GFCI outlet. I was sore in places I didn’t know I had.

But I saved hundreds of dollars doing it myself. Would I do it again?

Give me a little time to think it over. And remind me; how often should I manually test these things which automatically test themselves every 3 seconds?

Weather Sealing Your Door Jambs

The other day I mentioned that I put off replacing the weather sealing around our sun room door because of the heat. Yesterday, I did it in the morning before it got to 100 degrees, because there was another Excessive Heat Warning.

I saw a YouTube video of how to do this, and a guy was pushing the replacement strip in the kerf with a chisel. “Kerf” is a just fancy word for a slot in which you push the tab of the strip into the door jamb.

As I watched the video, I thought to myself, “I hope he doesn’t tear a hole in the strip with that chisel.” Then the guy actually warned viewers to be careful not to rip the weather seal with any sharp tool used to push the seal into the kerf.

It’s actually pretty easy to push the seal into the kerf. You just press it in with your fingers. The hard part is trying to keep your hands and work area clean while you’re peeling out the old strip. You do this by gripping it with needle nose pliers and pulling it out of the kerf just to get it started. This can lead to what amounts to a mini-rock slide spilling on the floor and maybe even in your face. You might think this would make you look like you worked really hard, mitigating any fallout from the mess you made.

Of course not! That’s because it’s hard to explain to your better half why there’s a pile of dirt, pieces of old seal on the floor, and grime on the fresh, new seal (the color of which is, of course, white) in addition to the swarm of hornets and flies, sparrows, the odd skunk—which you tried to hide by wiping things off with a new sponge that is earmarked for other cleaning jobs around the house, and calling pest control.

You can either try to measure the strip first and cut it before installing it or just start pressing it in at one end and estimating where to trim it (You can easily trim with a pair of stout scissors; don’t use the pair in the kitchen) when you get to the other end.

I tried the latter and the technical term for the unfortunate resulting quarter inch piece across the top of the doorway I added to make up the shortfall is “tacky.” Because of the orientation of the kerf tab, you can’t just flip it around to make it look like there’s no gap. That trick never works, apparently.

Fortunately, I’m entitled to a limited number of tacky handy man moves. Good luck.

Replacing a Two-Hole Faucet

I’m the least handy person on the planet. If I can replace a two-hole faucet, then even Bigfoot can do it.

Replacing the two-hole faucet is probably one of the easiest DIY jobs you can do. That doesn’t mean I didn’t have a problem or two with it.

When you get to the step in which you flush the water lines before installing the new faucet, turn the water lines back on very slowly. If you turn them back on as fast as you turned them off, the water pressure will blast you like Niagara. Water will go everywhere.

Hey, I’m an expert. And do you know what the definition of an expert is? A retired drip under pressure.

Dave the Handyman vs Ceiling Lights

David Sheldahl is a local handyman who has fixed a lot of things around our house. A couple days ago he installed a lot of new ceiling lights. The old ones were complicated enough that I stopped trying after breaking a couple of the junction boxes.

When it comes to handyman chores, I have a strict policy. First I carefully explain to Sena that I live a double life and when I’m not playing a retired psychiatrist, I’m one of the Men in Black and I’m likely to get paged to an intergalactic emergency involving absolute herds of zombified alien, one-eyed giant turkeys who have rocketed here across billions of light years and a wormhole vortex to renew their spaceship licenses at the only planet with DMVs in the universe and that I’m in charge of controlling disagreements over the inevitable dozens of suspended licenses because, let’s face it, just look at all the cases of crashed UFOs, they obviously can’t drive.

That never works because my neuralyzer is always clogged with pizza sauce. Then, my next recourse is to run away, although I usually just call Dave to help with yet another handyman job. If that running away doesn’t work, I often blunder in some fantastically improbable way and have to go to the Emergency Room to get sutures or casted. Just ask my wife.

Dave installed 5 ceiling lights in one day. He has the right tools for the right job. He even used a what resembled a coat hanger wire to hang on to the light fixture so he could keep his hands free to use his tools.

Dave has done several jobs for us. The first thing he did was to replace our crooked mailbox shortly after we moved in to our house. It was very hot that day and I felt bad for him. He did an excellent job. He installed outdoor lights, under the cabinet lights, fixed our patio door—he is mainly a self-taught jack-of-all trades, very professional, and reliable. He also has a pretty good sense of humor.

He doesn’t round up zombified alien turkeys or do roofing.

%d bloggers like this: