Chair Leg Cups for Floor Protection–Hah!

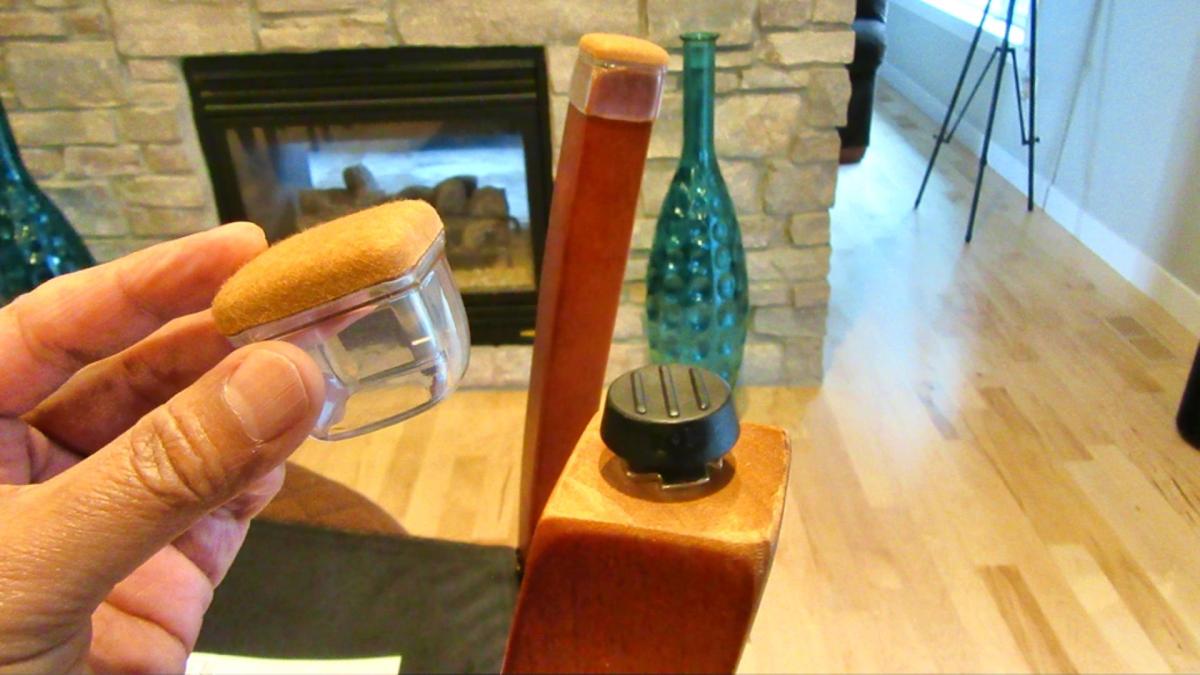
Okay, Sena ordered some chair leg cups to protect our wood floors. These are for the new Parsons chairs we got recently.

The cups and how to install them over the chair legs are enough to remind some people of condoms for extraterrestrials. These people have no morals and have not developed the maturity needed to listen to Rossini’s William Tell Overture without yelling at the top of their immature lungs, “Hi Yo, Silver!”

Anyway, we struggled with these condoms, I mean these chair leg prophylactics, I mean Hi Yo, Silver!”

Where was I? Oh, the cups came with no instructions. They are made of tough silicone and one end has a soft covering to enable sliding over carpet or wood floors. The manufacturers give you extra cups because they probably know you’re going to cut them up on your table saw when you figure out it will take approximately 5 hours to install one, just one, on any dining room chair without sustaining serious injury to your fingernails or getting one on just enough only to see it snap off and ricochet off your ceiling into the kitchen garbage disposal where you can gleefully grind it up into tiny condom particles.

Sena tells me the reviews are generally positive. Apparently, people writing these reviews either have no problems installing them on their furniture legs or they are pathological liars.

It really takes two persons to get these on a chair leg, one to hold down the chair, which for reasons known only to chairs, try to run away as soon as you try to put chair leg cups on them. While one person has to press down on specific corners of the cup to press them down, the other has to pull down on the sides.

If by some miracle you get all of the cups installed on the chair legs, you then turn the chair right side up, set it on your carpet or wood floor—and immediately notice that it won’t sit level. You then wonder if the problem was that you removed all the chair leg levelers (those little screw things on the bottom of the legs). Maybe you should not have removed them. Then you try putting the leveler back on, which of course means you have to remove the cup you labored to install, and then reinstall it.

After you do that—voila! The chair still sits cockeyed with one leg shorter than all the rest. Isn’t that clever? Actually, they worked out okay after the first couple and we did have to work as a team.

I think your best bet is to buy a house with dirt floors. You’re welcome.

Do You Really Need to Replace That Ceiling Light?

Sena and I just had a very challenging time installing a ceiling light to replace an old fan. I just want to point out that I would always rather hire a handyman to do this because I’m not real comfortable with electrical components. I can replace outlets and switches OK, but the ceiling fan…well, all I can say is we got the job done.

You always want to cut the power off at the circuit breaker before tackling a job like this, of course. And there are the usual problems with hooking up the right wires to each other between the ceiling light fixture (or whatever) and the electrical box in the ceiling.

The model of ceiling light we got had a fairly heavy base, which is the thing that has all the wires and the fluffy insulation and covers whatever mistakes you made in the electrical box. Just kidding.

This was a 2-person job for us and involved jockeying around on a tall ladder, taking turns hanging on to the heavy base while the other did the magic of making wiring connections. If the base had been lighter, we could have hooked up the ground wire in the ceiling with the ground wire in the fixture and just let it hang.

Sena found helpful YouTube videos about how to manage this installation. There were different perspectives on grounding, even on whether you need to do it given that some experts said the electrical box is already grounded so another grounding contact is unnecessary.

We grounded generously and even wrapped wire nuts with electrician’s tape.

Making the wire connections was hard enough, but we thought the most frustrating part was fishing for those two mounting screws through all that fluffy insulation on the base. I thought we’d never get that done.

If you ever have to do a thing like this, you might want to consider hiring the job out to someone who has a lot of experience with it.

Crank the volume on the video to hear my voice over comments.

Zinus Bed in a Box Assembly Notes: Bring on the Liniment

Well, we spent all day Friday the 11th assembling the Zinus Omkaram 48-inch Upholstered Navy Platform Bed, Full. We also ordered the Zinus Support Plus 14-inch Hybrid Mattress, Full to go with the bed. I posted a short slide show in my post Friday. I made the YouTube video yesterday.

The mattress reinflated up to 12 inches overnight after opening it on the bed. We’re not sure if it will reinflate to 14 inches. You’re supposed to let it reinflate over 72 hours.

Zinus provided all parts and tools, although in our case, one of the side rails had a Velcro piece that was factory-installed upside down. I had a smaller size allen wrench on hand, which was lucky. I just flipped it over.

The included small ratchet wrench was useful, although it had a little play in it. It’s a good idea to hand tighten the screws first, and wait until you’ve got all parts assembled before tightening them down. There’s not much give to get the side rails and slats assembled.

Sena saw one reviewer’s claim that he got the thing assembled in a half hour. We don’t believe it. The job took us all day, although to be fair, we stopped for things like breaks, hauling the mattress inside because FedEx just propped it against our garage, lunch, trips to the emergency room, physical therapy, rehab, kidnap by aliens wanting directions to the best rib joint, rescue by Men In Black, subjected to a big-ass neuralyzer, etc. We were sore when it was all done. All things considered, it went OK.

You might be wondering about the meaning of Omkaram. I don’t know what Omkaram means and googling it isn’t much help. Could it actually be a TV serial, a spiritual show that guides you in astrology? Is it a girl’s name in Sanskrit? Does the name mean you’re compassionate, friendly, spiritual, humanitarian, and—a workaholic?

Does that make any sense when it comes to platform beds? Right off hand, I don’t think so, but it probably doesn’t hurt to be a workaholic when it comes to assembling platform beds.

An Old Dog’s Approach to Replacing Electrical Outlets and Other Thoughts

Since retirement, I’ve been very gradually casting about for another identity now that I’ve given up my professional identity. It doesn’t come naturally. I’m definitely not a handyman, although I’ve been learning a few skills.

For some reason, a large number of our electrical outlets didn’t hold power cords tightly enough. They were either cheap or worn out or both. Appliances would stop running because the electrical plugs fell out of the outlets.

That led to Sena picking up an 85 gross of various replacement outlets, which led to losing one of my best excuses for not getting the vacuuming done. Since then, I’ve replaced a large number of outlets (see “instructional” video below). Toggle switch replacements are another item high on the list of vital electrical equipment to replace, mainly because they also get loose with age.

Funny how that doesn’t work for me. I get tighter in my joints as I age, which makes it very hard for me to sit cross-legged on the floor while replacing outlets. Standing up is even harder. That excuse doesn’t work either.

I’m pretty keen on checking outlets and the like for power before I start messing around changing them. I use a UL approved voltage tester for that—an electric can opener. Don’t let that get around. I always shut the power off at the circuit breaker to be safe.

Another skill comes to mine. Yesterday I had to install a soundbar on our TV for the first time. After Sena returned that one for a refund because it didn’t seem to improve on the TV’s audio, I installed a sound bar and subwoofer made by a different company.

I had a heck of a time getting it to work. It came with enough cords to hook it up, either by optical cable or something called HDMI ARC cable. Apparently, ARC stands for Audio Return Channel. I still don’t yet know why that makes it different from a regular HDMI cable.

What should have been a 10 to 15-minute hookup ended up taking most of an hour because neither cable worked. It was mysterious. I even hooked up both of them. The sound bar was soundless. In disgust, I yanked out the HDMI ARC—and abruptly the sound bar was loudly functional. Just prior to that I think I had moved the power plug from a power strip to a wall outlet. I figured the power strip might have just got old.

On the other hand, I had switched the sound bar plug and a CD player plug on the power strip which had been working fine and the sound bar still didn’t work. It was either aliens or luck. Sometimes it’s better to be lucky than good. I’m thinking about trying that HDMI cable again.

I have changed only in very small ways over the last 19 months (837,755 minutes; 50,265,308 seconds) since retirement. Some people say you can’t teach an old dog new tricks. I wonder if some people are just being ironic.

The Art of Picture Hanging

We’re hanging pictures at our house. You need the right tools for this and a good sense of proportion, the latter of which I lack. You also need a picture, which should be rectangular. I’ve included a snapshot of what you should have on hand.

The spackling compound is essential, because I guarantee you’ll mess up your wall trying to find the exact spot to pound, screw, or glue the fasteners. Don’t try to get them right by measuring the first time. This is going to take a while.

You’ll need a calculator and a little time to search your memory for the long-lost grade school algebra skills. These might help you place the picture on the wall so that it symmetrically aligns with the boundaries of the wall itself, the toggle switch plate, the coat closet door frame, and the edges of the expanding universe compatible with the time frame following the big bang.

The formula for finding the place on the wall such that there are equal spaces are on either side is width of the picture plus 2x= width of the wall (w+2x=W).

w+2x=W

2x=W-w

x=W-w/2

Of course, this doesn’t work for your wall, usually because there is some kind of fancy bevel or other contour the architect thought would be suitable for torturing homeowners trying to hang pictures.

The next step is to consider your picture-hanging kit, which is designed by aliens who are always running their fool experiments on earthlings. The parts are made of durable plastic, which break when you breathe on them.

After you have tossed the kit and the worthless instructions in the garbage, go to the hardware store and buy something called Hangman picture hangers, designed by Bear Claw. After your careful measurements, you will completely fail to screw the hangers in the exact spot which should correspond with the brackets fastened on the back of the picture. Don’t worry, at this point it’s completely normal to have explicit thoughts regarding the word “hangman.”

That’s because no matter how often you measure using a precision-calibrated tape measure, you will end up using terms like “skosh” to adjust the position of the picture and the hangers to fit the hangers into the brackets. The scientifically proper use of the word “skosh” (which comes from the Japanese word “sukoshi” pronounced “skoh shee” meaning a little bit, although I’ve never heard anyone pronounce it this way) involves telling your wife, husband, friend, or whoever is assisting in the picture hanging fiasco, to sagely advise that person to “Move it just a skosh to your left—other left.” Remember that most of us pronounce skosh as just plain one syllable skosh with a long “o” and absolutely nothing rhymes with it in plain English. I think I first heard it from a guy who was from Texas.

The reason the skosh is so essential is that you will have to move your fastener or your picture just that exact distance or you will screw your hanger into the exact same hole you started with and which is hopelessly wrong, whether it’s in the dry wall or firmly in a stud.

You are required by Federal law to use a level to make sure the picture hangs straight and doesn’t slant even a skosh to the left or right. There will always be people who will judge the picture is not level just by eyeballing it, even if the level is absolutely spot on with the bubble exactly centered. The only way to counter this tendency is to offer them enough beer to make them tilt in the opposite direction.

You’re welcome.